
Do you use a favicon for your website? This small image next to the page title in the browser? If not, you should definitely change that. I’ll explain how you can add a favicon to WordPress.
What is a Favicon?
A favicon (short for Favorite Icon) is a small icon that you can set as your favorite image for your website. When someone views your page, they will see this small image in the browser tab right next to the page title.

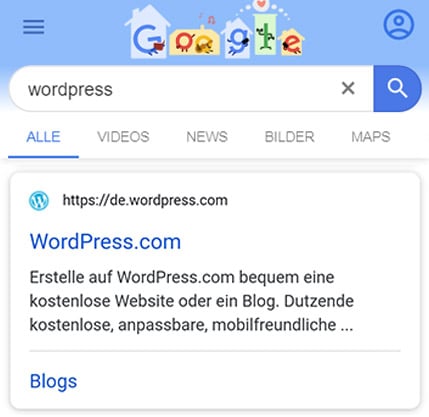
But the favicon is also displayed in bookmarks, home icons and in mobile search results.
The Favorite Icon offers you many advantages:
- Your brand is strengthened and the recognition value is increased.
- Your web presence looks more professional overall
- Branding in the mobile search results
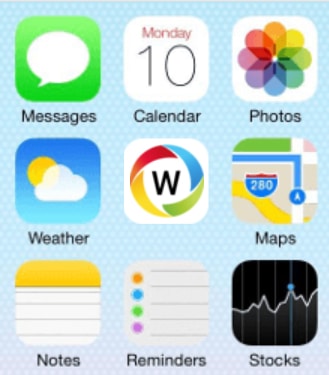
Here are some examples for the display of the favicon:
How to create a favicon?
In the first step you should choose a suitable image for your favicon. Of course, your logo is the best choice. Then you convert it to a square format (512 x 512 pixels).
Next, save the file as a JPG. If you want the background to be transparent, you can also save the image as PNG or GIF.
With the created file you can create your own favicon. Either directly in WordPress or with online tools.
For a favicon to be displayed, it must be referenced in the code of your website. In the past, you simply used the file format ICO for this. This contains the required icons in the sizes 16×16 pixels and 32×32 pixels for the browsers.
<link rel="icon" href="/favicon.ico" type="image/x-icon">But over the years, other output devices have been added, such as cell phones, tablets and apps. In order for a website icon or favicon to be displayed here as well, other image formats have to be included.
Example Apple Touch Icon:
<link rel="apple-touch-icon" sizes="180x180" href="apple-touch-icon.png">Of course, you don’t have to do it all by manually! Because as a WP user you can very quickly and easily integrate your favicon in WordPress. I’ll introduce you to the different possibilities.
Add Favicon in WordPress via Customizer
You want to add a favicon to WordPress fast and easy? Then you should use the WordPress Customizer.
For this you need an image in the size of at least 512 x 512 pixels. Once you have found a suitable image such as your logo, open the Customizer.
Under > Site Identity you can now upload your image as site icon.
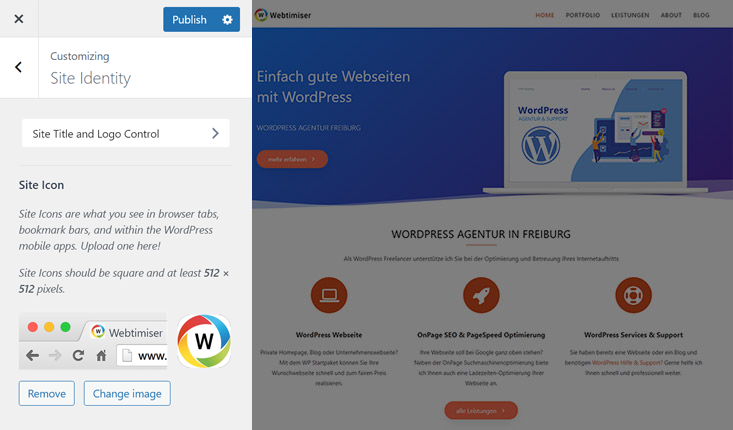
Immediately after clicking Publish, your WordPress favicon is visible in the browser tab.
However, WordPress generates only the default favicon. So no icons for home buttons or Windows tiles.
Insert WordPress Favicon in Theme
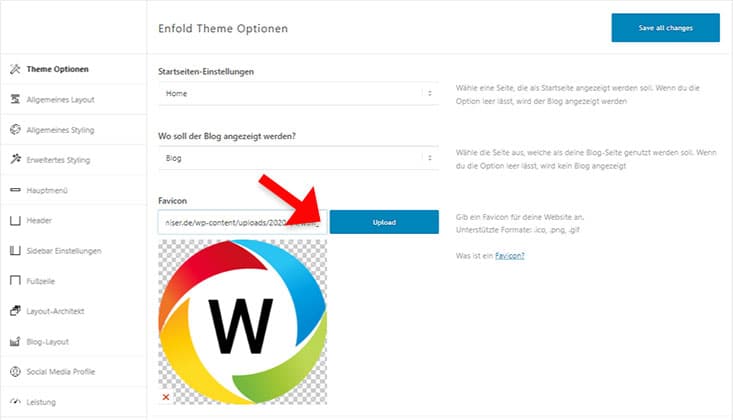
Also some WordPress themes offer you the possibility to add a website icon into WordPress. For example, Enfold allows you to upload the favicon directly in the Theme Options tab.
Where you find this option, of course, always depends on your WordPress theme.
Embed favicon with WordPress plugin
You want more than just a standard display of your website icon? Then a WordPress Favicon Plugin could be the right thing for you.
Because with it you can easily integrate the favicons for different devices. For example, the Apple Touch icon or the icon for the Windows tiles.
As always with WordPress, there are several plugins for this task. I have only used the following plugin and was very satisfied with it.

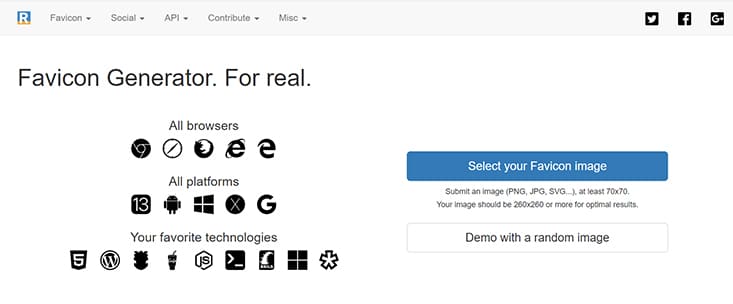
The most popular plugin for WordPress favicons is Favicon by RealFaviconGenerator. Here you only have to upload the desired image – the rest is done by the plugin. Not only the favicon for browsers is created. Additionally you get the versions for iPhone/iPad, Android, Windows Tiles and more.
Add favicon to WordPress manually
You want to save yourself another plugin and know a little about WordPress? Then you can of course insert selected favicon variants manually.
On my website, I have integrated the normal favicon via the WP-Customizer.
For all other variants I’ve used the online tool RealFaviconGenerator.
This is also exactly the website behind the presented WordPress Favicon Plugin.
The handling of the favicon generator is very simple!
Right after you upload your image, the tool will show you a preview of your favorite icon on the different devices.

If you want, you can even adjust the image size and background. If everything meets your requirements, you can create all the necessary files with one click.
The generator will deliver a favicon package with all symbol files. In addition, you will be shown the code that you can insert into the header (header.php). If you want to use this way, it is best to create a child theme first.

For my website, I uploaded the favicon package to the /wp-content/favicons folder. However, for embedding the files, I did not include the code in the header file.
Before adding code to your website, you should first make a backup of your website.
Instead, I created a small snippet and entered it into functions.php. This then looks like this:
function my_favicon() {
echo '<link rel="apple-touch-icon" sizes="180x180" href="/wp-content/favicons/apple-touch-icon.png">
<link rel="icon" type="image/png" sizes="32x32" href="/wp-content/favicons/favicon-32x32.png">
<link rel="icon" type="image/png" sizes="16x16" href="/wp-content/favicons/favicon-16x16.png">
<meta name="msapplication-TileColor" content="#da532c">
<meta name="theme-color" content="#ffffff">';
 }
add_action('wp_head', 'my_favicon');